Instructions
back to main page
Description
Judgement Quest: Knighthood Adventure (JQ:KA) is a solitaire roguelike game, featuring a 27-room dungeon, random quests, items, spells, evil creatures, and an optional victory point scoring system and campaign mode. The rules are quick to learn and easy to remember based on mnemonics incorporated throughout the game. Games typically last between 10 and 15 minutes (including setup time), and only require a standard deck of (52) playing cards. Alternative components, such as dice or tokens, may be incorporated as desired. Printable card images with custom artwork are available. A standalone roll-and-write (dice-and-paper) version is also available.
Story
You are an adventurer seeking to become a knight in the court of King Frederick. The King judges whether anyone is worthy of this prestigious honor by sending them on a quest to a mysterious dungeon, where four tasks must be completed. If you return safely and successfully, the King shall confer knighthood upon you.
The few that have succeeded in their quests have returned with maps made while exploring the dungeon. Comparing these maps has revealed that although the dungeon shape and room contents seem to be consistent, no two maps agree on the layout of the rooms.
Some adventurers report having seen a dragon in the dungeon, and it is well-known that dragons are both cunning and magical. It is believed that this dragon scatters gold pieces and treasure throughout the dungeon to lure those seeking riches, and each time someone enters, the dragon uses its magical powers to rearrange the rooms (which would explain their ever-changing nature). This causes people to become lost and confused, after which most perish from the dangers that exist throughout. It is also thought that the evil creatures lurking in the dungeon are the reanimated remains (spirit, flesh, and bone) of these deceased explorers, twisted by the dark magic of the dragon; they now mercilessly attack any who dare venture forth.
Armed only with your sword and your wits, you will need both strategy and luck to accomplish your tasks, complete your quest, and become a knight!
Overview
At the beginning of the game, you have 6 health points and you are randomly assigned 4 tasks. You must navigate the dungeon to complete these tasks and win the game. A variety of obstacles may cause you to lose health points and thereby eventually lose the game. Some rooms contain gold pieces, random items, and merchants that can aid your progress.
Dungeon Rooms: Descriptions
These are the types of rooms you may encounter while exploring the dungeon; detailed information is provided in the gameplay section.
- Staircase: A set of stone steps descend from the surface to the entrance of the dungeon.
- Gold Piece (GP): A piece of gold lies on the floor of this otherwise empty room.
- Ice Cavern: An unnaturally bitterly cold room causes you pain each time you enter.
- Locked Door: A locked door bars your progress.
- Treasure Chest: An unopened treasure chest lies in the center of this room.
- Wizard Merchant: A mysterious sorcerer is prepared to help you in your quest -- for a price.
- Crystal of Viewing: A mysterious crystal orb sits on a pedestal, allowing you to view a room far away.
- Enchanted Fountain: A fountain of water shimmers with a strange light that may indicate a blessing or a curse.
- Stone Wall: An impenetrable stone wall blocks your path.
- Arrow Traps: Spring-loaded arrow traps line the walls and will activate if you step into this room.
- Specter / Slime / Skeleton: Evil creatures wait in the darkness, attacking all who dare enter.
- Wooden Shield: A damaged wooden shield lies next to the remains of a deceased adventurer.
- Dragon: The evil master of this dungeon, strong and dangerous, guards a great treasure.
Inventory
In your inventory, you will keep track of the number of gold pieces (GP) and the items you have collected.
GP may be obtained from Gold Piece rooms, randomly found in Treasure Chests, and won by defeating the Dragon.
Items are randomly found in Treasure Chests or purchased from Wizard Merchants in exchange for GP.
The items and their effects are as follows:
- Flame Amulet: prevents you from taking damage in Ice Cavern rooms
- Dungeon Key: allows you to pass through Locked Door rooms
- Flask of Healing Potion: restores 3 health points; may be used once at any time
- Wooden Shield: prevents damage from a single trap or attack at a time of your choosing
Quest Tasks
For each quest, King Frederick randomly assigns each adventurer four tasks, one from each of the following four categories (which can be remembered with the mnemonic F.R.E.D.).
You must complete all four tasks and return to the dungeon entrance to complete your quest and win the game.
- Fetch objects (Gold Pieces -or- Treasure Chests -or- Wooden Shield)
You must obtain the required object(s) from the corresponding room(s) to give to the King.
- Remove obstacles (Ice Chambers -or- Locked Doors -or- Arrow Traps)
You must make the dungeon easier to navigate. Either melt the ice in both Ice Chamber rooms (requires Flame Amulet), unlock both Locked Doors (requires Dungeon Key), or make both Arrow Traps rooms safe for passage (by triggering the traps).
- Explore room types (Crystal of Viewing -or- Enchanted Fountain -or- Stone Wall)
You must locate both instances of the given room type.
- Defeat monsters (Specters -or- Slimes -or- Skeletons -or- Dragon)
You must defeat all instances of the given monster type.
Health Points
You begin with 6 health points (HP). Many dangers cause you to lose HP:
- entering an Ice Cavern (without the Flame Amulet)
- opening a Treasure Chest that has been trapped
- drinking from an Enchanted Fountain whose water is cursed
- failing to dodge Arrow Traps
- being attacked by an enemy (Specter, Slime, Skeleton, or Dragon)
There are only a few ways to restore HP:
- drinking a Flask of Healing Potion
- having a Spell of Healing cast on you by a Wizard Merchant
- drinking from an Enchanted Fountain whose water is blessed
If your HP is reduced to 0, you have perished in the dungeon and the game is over.
Game Play
The rules are summarized below; phrases in bold italics are described in detail in the following sections.
- There are three main parts to set up the game:
lay out dungeon rooms, generate quest tasks, and prepare inventory
- You begin at the staircase room in the center of the dungeon.
- If you wish, you may keep track of your current position in the dungeon with a token (coin, cube, meeple, etc).
- When you enter a room (including the staircase), you immediately reveal each adjacent room.
- There are mnemonics to help you remember which items/rooms correspond to which cards.
- You may move to an adjacent room in accordance with the dungeon room details,
which also describe the optional or required actions associated with each room.
Some room actions will require you to generate a random value.
- If you have completed the action associated with a room and nothing remains to be done in that location,
you then resolve the room. If the room corresponds to your Fetch Items quest task, then resolve the room immediately, and you do not obtain anything from that room.
- You lose the game if your health points are reduced to zero.
- You lose the game if it becomes impossible to complete your quest tasks.
(This is possible, for example, if required rooms are blocked from all approaches by unresolved, impassible rooms such as Locked Doors or Stone Walls. Usually this is avoidable given the available Treasure Chests, Gold Pieces (including the Dragon's hoard), and the Wizard Merchant spells and items.)
- You win the game if you complete the four quest tasks and return to the staircase room to leave the dungeon.
- If you wish, you can rate your quest performance according to the victory point system,
or extend your adventure with multiple quests in campaign mode.
The initial setup is illustrated in the diagram, and is explained in the text that follows.
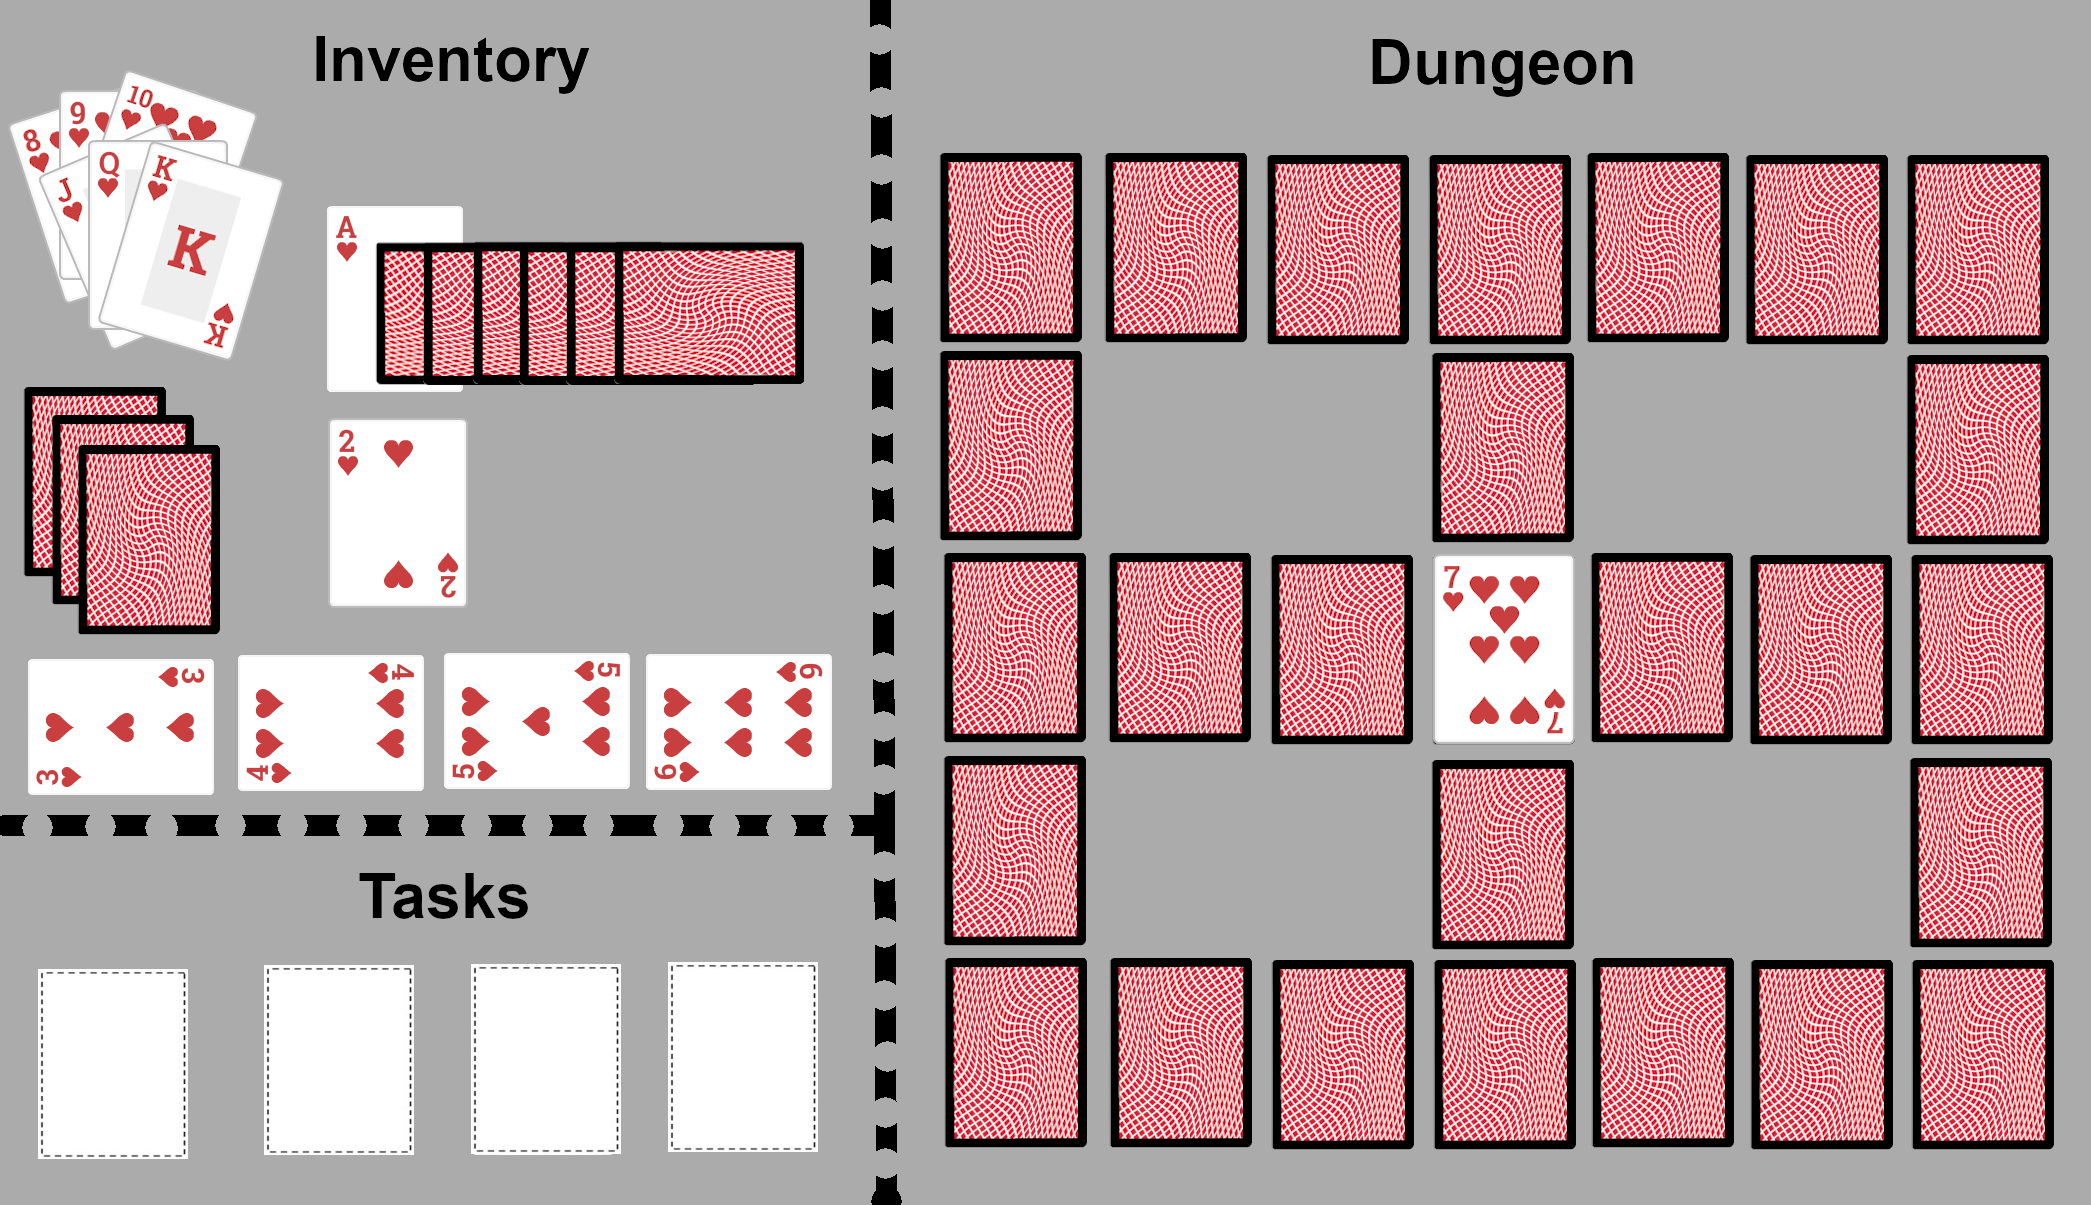
Lay Out Dungeon Rooms
The cards representing dungeon rooms will be laid out in a rectangular 7-by-5 area, as shown in the diagram.
Lay the 7 of Hearts (♥) in the central position in this area; this represents the staircase to the dungeon.
Gather all the Club (♣) and Spade (♠) suit cards from the deck, shuffle them, and lay them face down as shown in the diagram. These cards correspond to the rooms as shown in the following list.
- 2♣/2♠: Gold Piece (GP)
- 3♣/3♠: Ice Cavern
- 4♣/4♠: Locked Door
- 5♣/5♠: Treasure Chest
- 6♣/6♠: Wizard Merchant
- 7♣/7♠: Crystal of Viewing
- 8♣/8♠: Enchanted Fountain
- 9♣/9♠: Stone Wall
- 10♣/10♠: Arrow Traps
- J♣/J♠: Specter
- Q♣/Q♠: Slime
- K♣/K♠: Skeleton
- A♠: Wooden Shield
- A♣: Dragon
To help remember this list, note that:
- Numbered cards correspond to the number of letters in part of the room name, in bold underlined font.
- The "face" cards (J/Q/K) correspond to the common enemy creatures, in order of increasing danger.
- The Ace of Spades corresponds to the Shield, while the Ace of Clubs is a Creature.
Generate Quest Tasks
As described in the Overview section on Quest Tasks, the tasks fall into four categories: Fetch items, Remove obstacles, Explore room types, or Defeat monsters. Gather all the Diamond (♦) suit cards from the deck. Each diamond card corresponds to a task involving the associated room, as described previously, with the two exceptions: the Ace represents defeating the dragon, and the Six represents collecting the shield. In summary, the quest tasks are represented as follows:
- Fetch Items (from rooms only):
2♦: Gold Pieces, 5♦: Treasure Chests, 6♦: Wooden Shield
- Remove obstacles (both instances):
3♦: Ice Caverns, 4♦: Locked Doors, 10♦: Arrow Traps
- Explore room type (locate both instances):
7♦: Crystal of Viewing, 8♦: Enchanted Fountain, 9♦: Stone Wall
- Defeat monsters (all instances):
J♦: Specters, Q♦: Slimes, K♦: Skeletons, A♦: Dragon
To generate the four quest tasks, shuffle the diamond cards (face down), and turn them over one-by-one. The first card revealed in each category will be the assigned task. Place the four quest task cards face up in the lower left of the gameplay area. These four cards are also used to track quest progress: once a task is complete, indicate this by turning the card to a horizontal orientation.
Prepare Inventory
Gather the following Heart (♥) suit cards from the deck: A, 2, 3, 4, 5, 6. Arrange them as indicated in the diagram.
These cards are used to represent inventory items as follows:
- A♥: Health Points (HP)
- 2♥: Gold Pieces (GP)
- 3♥: Flame Amulet
- 4♥: Dungeon Key
- 5♥: Flask of Healing Potion
- 6♥: Wooden Shield
Place counters (unused face-down Diamond cards) on the Ace and 2 of Hearts to indicate the amount of HP and GP, as shown in the diagram; you begin with 6 HP and 0 GP.
- Alternatively, you may use any type of tokens (coins, cubes, etc.) or a 6-sided die as counters.
The orientation of the 3, 4, 5, and 6 of Hearts cards indicate which items you have collected; each card is initially placed horizontally, and rotated to the vertical position when you obtain the corresponding item. You may only have one of each item at any time. If a single-use item (Flask or Shield) is used, rotate the card back to the horizontal position. The Amulet and Key are used multiple times.
To help remember this list, note that:
- Ace, representing HP, has a single Heart in the middle, a standard symbol for health.
- The number 2 is also used for the cards representing GP rooms.
- The items for cards 3 and 4, the Flame Amulet and Dungeon Key, are used to interact with
the Ice Cavern and Locked Door rooms, which are also indicated with the numbers 3 and 4.
- The items for cards 5 and 6, the Flask of Healing Potion and Wooden Shield, each contain a word with the same number of letters as the card (the mnemonic used for dungeon rooms).
Revealing a Room
To reveal a room, flip over the card corresponding to the room so that it is face up.
Resolving a Room
To indicate that a room is resolved, rotate the corresponding card to a horizontal position.
Generating a Random Value
Gather the following Heart (♥) suit cards from the deck: 8, 9, 10, J, Q, K.
These will correspond to the values: 1, 2, 3, 4, 5, 6, respectively.
To generate a random number, shuffle these cards (face down) and randomly choose one.
- Alternatively, you may roll a 6-sided die to generate a random value.
In general, a positive outcome for a random event occurs when a high value (4, 5, or 6) is generated (equivalently, when a "face" card (J, Q, or K) is drawn), otherwise there will be a neutral result or a penalty.
To help remember the table of results for a Treasure Chest, the value generated (1 through 6) also corresponds to the number of the card in the inventory, representing the item to be added or the value to be affected (where 1 = Ace).
Dungeon Rooms: Details
There are 13 different types of rooms, each of which occurs twice, with the exceptions of the staircase, dragon, and shield rooms (each of which occur once) for a total of 27 rooms in the dungeon.
- Staircase: A set of stone steps descend from the surface to the entrance of the dungeon.
You begin in this location, and must return here once all four quest tasks are complete to win the game.
- Gold Piece (GP): A piece of gold lies on the floor of this otherwise empty room.
Add one GP to your inventory and then resolve the room, indicating that the room is now empty.
- Ice Cavern: An unnaturally bitterly cold room causes you pain each time you enter.
Every time you enter this room without the Flame Amulet in your inventory, reduce HP by 1. If you enter this room with the Flame Amulet, do not reduce HP and resolve the room, indicating that the ice has melted.
- Locked Door: A locked door bars your progress.
You may not enter this room unless you have the Dungeon Key in your inventory.
When you enter this room, resolve the room, indicating that the door is permanently unlocked.
- Treasure Chest: An unopened treasure chest lies in the center of this room.
Generate a random value to determine what lies within the chest, according to the following table.
If the result is an item already in your inventory, gain 2 GP instead.
Then resolve the room, indicating that the chest is now empty.
| [ 1 ] : chest is trapped, lose 1 HP | [ 2 ]: 1 GP | [ 3 ]: Flame Amulet |
| [ 4 ] : Dungeon Key | [ 5 ]: Flask of Healing Potion | [ 6 ]: Wooden Shield |
- Wizard Merchant: A mysterious sorcerer is prepared to help you in your quest -- for a price.
There are two Wizard Merchants roaming the dungeon, each offering different services in exchange for payment. Each Wizard may be visited as many times as desired; these rooms do not resolve.
The first Wizard you encounter has been investigating the rooms and magical forces present throughout the dungeon, attempting to replicate or manipulate their properties or effects.
For 1 GP, this wizard will cast one of the following spells of your choosing:
- Spell of Seeing: reveal any one room (the same effect as the Crystal of Viewing room)
- Spell of Healing: gain 1 HP (the same effect as drinking blessed water from the Enchanted Fountain)
- Spell of Dissolving: resolve any one revealed Stone Wall room; you may now pass through that room.
- Spell of Disarming: resolve any one revealed, unresolved Arrow Traps room
The second Wizard you encounter specializes in artifacts.
For 2 GP, this wizard will sell you any inventory item that you do not currently have:
the Flame Amulet, the Dungeon Key, a Flask of Healing Potion, or a Wooden Shield.
- Crystal of Viewing: A mysterious crystal orb sits on a pedestal, allowing you to view a room far away.
If this room is unresolved, you may choose to reveal any currently unrevealed room, then resolve this room, which indicates that the power of this crystal has been drained and may not be used again.
- Enchanted Fountain: A fountain of water shimmers with a strange light that may indicate a blessing or a curse.
If this room is unresolved, you may choose to drink from the fountain: generate a random value to determine the effect of the water, according to the following table, then resolve the room, indicating that the water no longer shimmers and is now simply ordinary water.
| [ 1 ], [ 2 ], [ 3 ]: cursed water; lose 1 HP | [ 4 ], [ 5 ], [ 6 ]: blessed water; gain 1 HP |
- Stone Wall: An impenetrable stone wall blocks your path.
You may not enter this room unless you have paid a Wizard Merchant to cast a Spell of Dissolving on this room.
- Arrow Traps: Spring-loaded arrow traps line the walls and will activate if you step into this room.
If you enter this room and it is unresolved, then the arrow traps are triggered. Generate a random value to determine if you are able to dodge the arrows and avoid taking damage, according to the following table.
If you have a Wooden Shield in your inventory, you may use it to prevent damage; if it does so, it is destroyed.
Afterwards, resolve the room, indicating that the traps have been triggered and no dangers remain in this room.
| [ 1 ], [ 2 ], [ 3 ]: hit by arrows; lose 1 HP | [ 4 ], [ 5 ], [ 6 ]: dodge arrows |
- Specter / Slime / Skeleton: Evil creatures wait in the darkness, attacking all who dare enter.
If you enter one of these rooms and it is unresolved, then an enemy is present and you will enter combat. Your sword has the power to defeat any enemy with a single blow -- if you are able to hit them. Generate a random value to determine the result of combat, according to the following tables. If you have a Wooden Shield in your inventory, you may use it to prevent damage; if it does so, it is destroyed.
| Specter: |
| [ 1 ]: enemy hits you; lose 1 HP | [ 2 ], [ 3 ]: both miss | [ 4 ], [ 5 ], [ 6 ]: you hit and defeat enemy |
| Slime: |
| [ 1 ], [ 2 ]: enemy hits you; lose 1 HP | [ 3 ]: both miss | [ 4 ], [ 5 ], [ 6 ]: you hit and defeat enemy |
| Skeleton: |
| [ 1 ], [ 2 ], [ 3 ]: enemy hits you; lose 1 HP | | [ 4 ], [ 5 ], [ 6 ]: you hit and defeat enemy |
If you defeat the enemy, resolve this room. After a round of combat, if the enemy has not been defeated, you may stay in the room and begin a new round of combat, or return to the room you were previously in. Even though entering this room causes adjacent rooms to be revealed, you may not pass through until the enemy is defeated.
- Wooden Shield: A damaged wooden shield lies next to the remains of a deceased adventurer.
If there is no shield in your inventory, add a shield to your inventory and resolve the room, indicating that the room is now empty. You may only carry one shield at a time; if you already have a shield, the room remains unresolved and you may return later to collect the shield (if your current shield breaks).
- Dragon: The evil master of this dungeon, strong and dangerous, guards a great treasure.
This room functions the same as the previously described combat rooms, with the key differences being that the dragon is guaranteed to cause much more damage if you miss (according to the following table), and if you win, you collect the treasure it was guarding.
| [ 1 ], [ 2 ], [ 3 ]: dragon hits you; lose 3 HP | [ 4 ], [ 5 ], [ 6 ]: you defeat dragon; gain 3 GP |
Victory Point System
At the end of a successful quest, you can evaluate your performance by awarding victory points (VP) as follows:
- +1 VP for each health point remaining
- +1 VP for each gold piece remaining
- +2 VP for each item in your inventory
- +1 VP for each monster defeated
If you wish, you may continue to explore the dungeon and attempt to amass additional VP after your quest tasks have been completed and before you choose to use the staircase to return to the surface.
After knighthood is bestowed upon you, you may receive an additional title, depending on the number of VP earned:
- 9 VP: Lieutenant.
You have survived and shown a great deal of capability in navigating the dungeon and its dangers, and so you are immediately accepted as a junior officer and trusted with additional responsibilities.
- 12 VP: Captain.
Stories of your victorious quest are recounted by your fellow knights, who recognize and acknowledge your valor and skill. You have earned their respect and admiration, and as they are willing to follow you, it is only natural that you are placed in command of a regiment.
- 15 VP: Lord Commander.
The king has noticed that you are singularly talented and powerful, and highly values your allegiance. In recognition of your great deeds, you are granted a parcel of land near the King's castle, and he bestows the title of Lord upon you, in addition to naming you Commander of the Knights.
- 18 VP: King.
To have survived the judgement quest in itself is an accomplishment; having sustained so few injuries while defeating so many monsters and acquiring so much treasure is nothing short of miraculous. Your fellow knights revere you as "the chosen one", outclassing even the King himself in the prime of his youth. After much consideration, the King names you as his heir, and steps down from the throne so that you may rule the kingdom in his place and lead its people to a glorious destiny.
Campaign Mode
In campaign mode, holding a title at the end of a quest will result in resources available to you at the beginning of your next quest. Your ultimate goal is to advance through the ranks of the knighthood and become king.
When you complete a quest, calculate your victory points. If you qualify for a title, you will hold that title if it is greater than the one you currently hold (or if you currently hold none). At the beginning of a quest, if you hold a title, you enter the dungeon with gold pieces in your inventory: a Lieutenant / Captain / Commander starts with 1 / 2 / 3 GP, respectively. During a quest, you may choose to declare a failed attempt and exit the dungeon (via the staircase room). In this case, if the number of completed tasks is greater or equal to the number of GP you entered the dungeon with, the king deems your efforts sufficient and you maintain your current title. Otherwise, your performance is considered inadequate for one befitting your rank and your title is replaced by the one preceding it (as listed in the Victory Point section). While such a penalty is certainly a setback during a campaign, it is certainly preferable to perishing during a quest, in which case the entire campaign is lost.
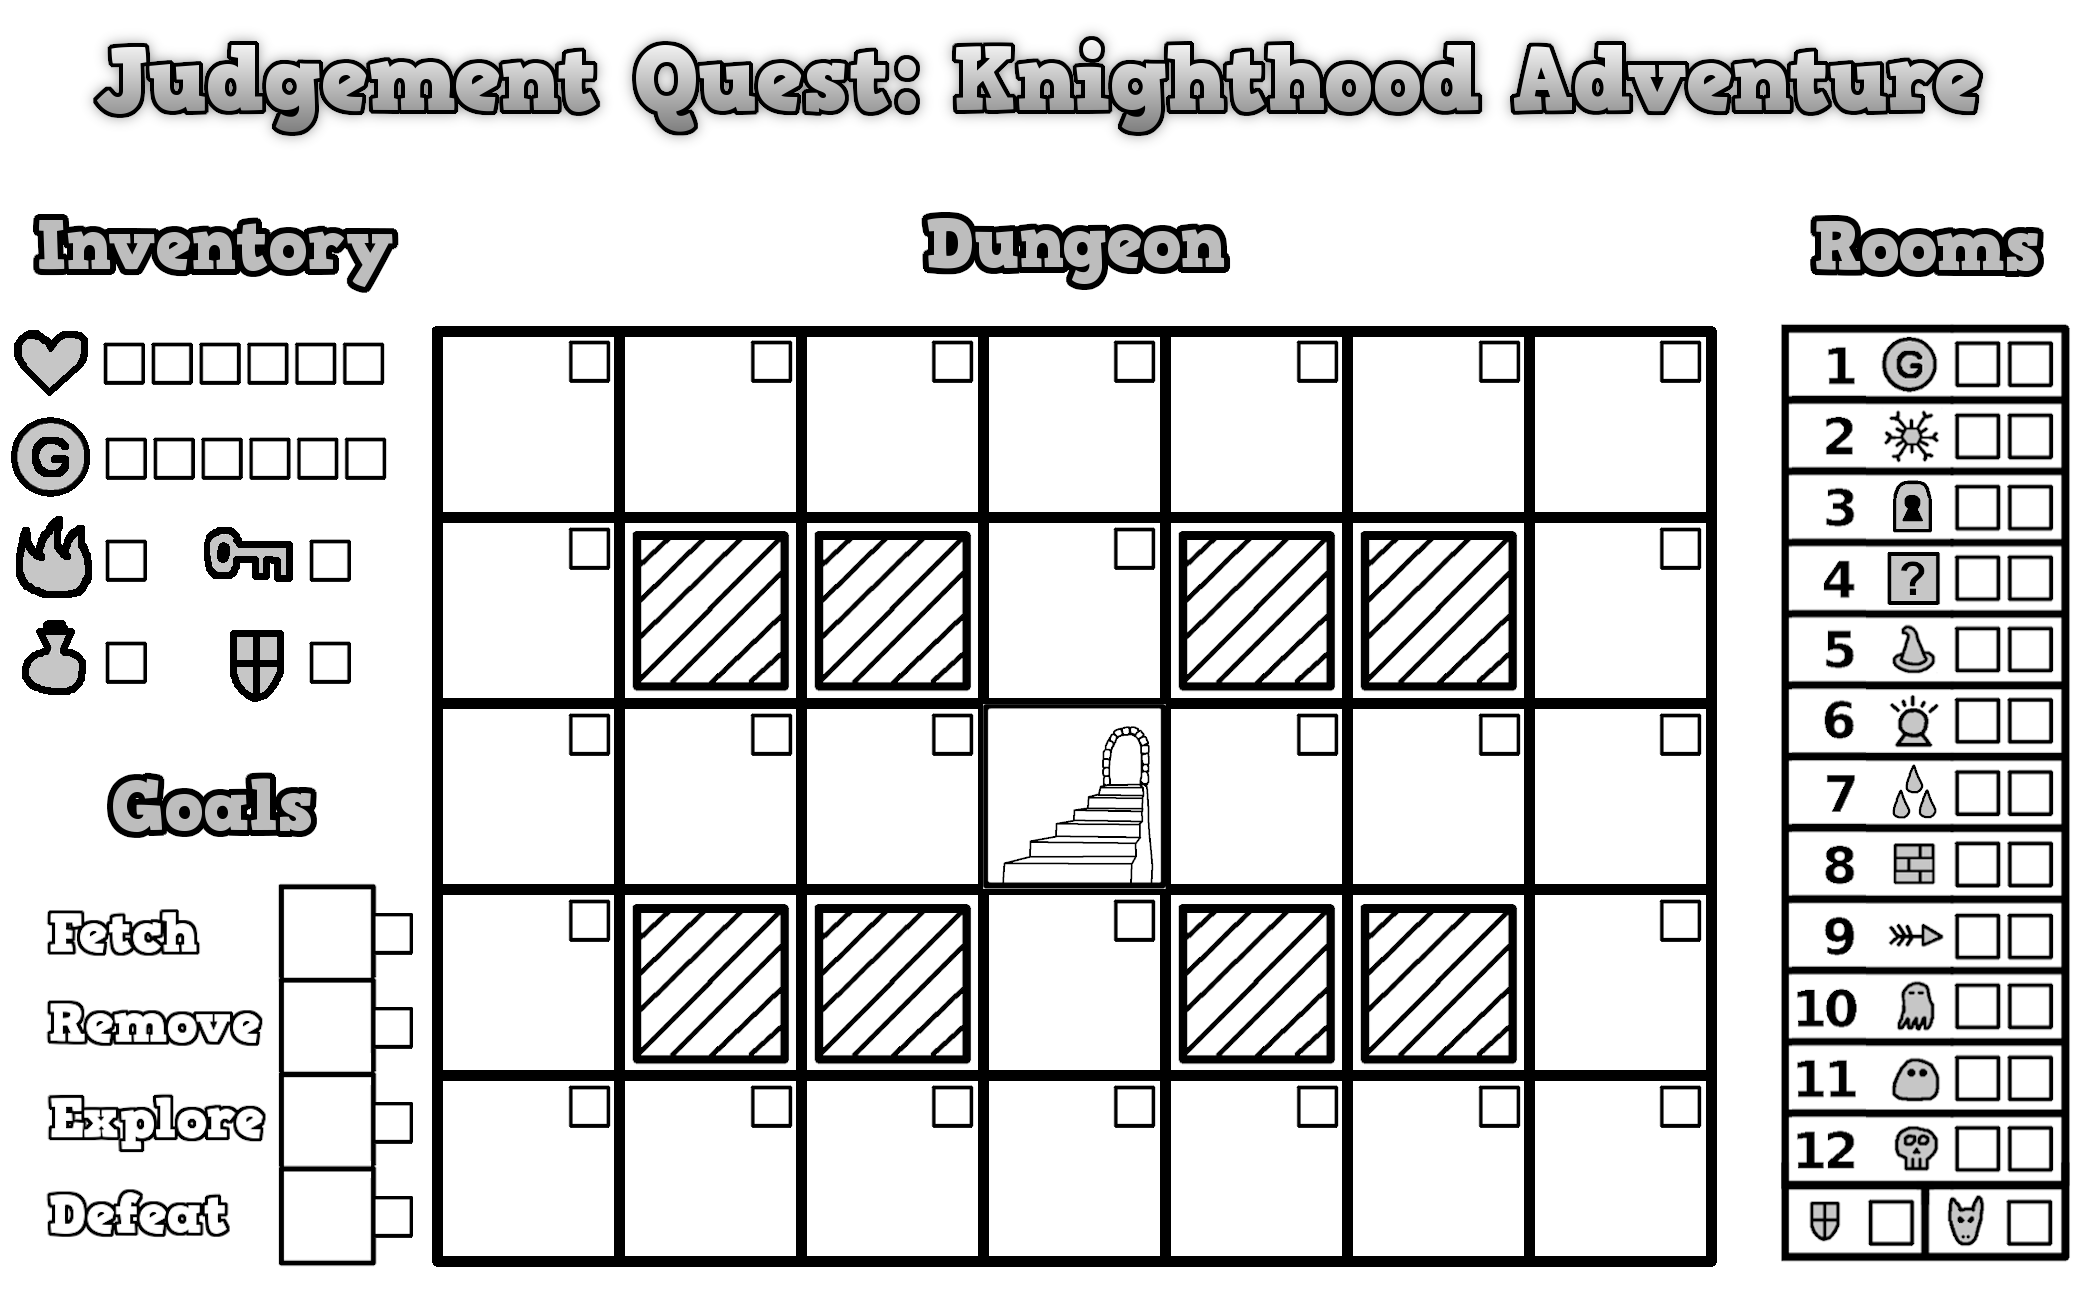
Roll-and-Write Version
The roll-and-write version of JQ:KA uses a six-sided die (D6) and a twelve-sided die (D12), a pencil and eraser, and a printout of the following game sheet (available on the game website):
- Alternatively, two D6 rolls may be used to generate a D12 roll as follows: Roll a D6 twice; for the final value, use the result of the first roll and add 6 if the second roll lands on a high number (4, 5, or 6).
The general game procedure and room rules from the card version apply to this version with the following modifications:
Dungeon Rooms
Room types are represented by icons or abbreviations as follows:
 Gold Piece (GP) Gold Piece (GP) |
 Ice Cavern (IC) Ice Cavern (IC) |
 Locked Door (LD) Locked Door (LD) |
 Treasure Chest (TC) Treasure Chest (TC) |
 Wizard Merchant (WM) Wizard Merchant (WM) |
 Crystal of Viewing (CV) Crystal of Viewing (CV) |
 Enchanted Fountain (EF) Enchanted Fountain (EF) |
 Stone Wall (SW) Stone Wall (SW) |
 Arrow Traps (AT) Arrow Traps (AT) |
 Wooden Shield (WS) Wooden Shield (WS) |
 Specter (Sp) Specter (Sp) |
 Slime (Sl) Slime (Sl) |
 Skeleton (Sk) Skeleton (Sk) |
 Dragon (Dr) Dragon (Dr) |
When recording a quest task or revealing a room, you may either draw the icon or write the abbreviation in the corresponding box.
The small boxes next to the room icons in the room list (on the right side of the game sheet) are used to keep track of the rooms that have been revealed. Each time a room is added to the dungeon map, also mark a corresponding box in the room list.
Generate Quest Tasks
For each category of tasks, roll a D12 and assign a task according to the following table:
| Fetch Items: |
| [1-4]: Gold Pieces | [5-8]: Treasure Chest | [9-12]: Wooden Shield |
| Remove obstacles: |
| [1-4]: Ice Cavern | [5-8]: Locked Door | [9-12]: Arrow Traps |
| Explore rooms: |
| [1-4]: Crystal | [5-8]: Fountain | [9-12]: Stone Wall |
| Defeat monsters: |
| [1-3]: Specter | [4-6]: Slime | [7-9]: Skeleton | [10-12]: Dragon |
Mark the small box adjacent to each quest task box when the task is complete.
Prepare Inventory
Inventory elements are represented by the following icons:
 Health Points (HP) Health Points (HP) |
Gold Pieces (GP) |
 Amulet of Flames Amulet of Flames |
 Dungeon Key Dungeon Key |
 Flask of Healing Potion Flask of Healing Potion |
Wooden Shield |
Indicate HP and GP amounts and items obtained by marking adjacent boxes. Erase and remark as needed.
Revealing a Room
Roll a D12 and locate the corresponding numbered room type in the room list. If both instances of that room type have not yet been revealed, then add the room to the dungeon map and mark a corresponding box in the room list. Otherwise, substitute the next room type in the list that has not yet been revealed. The ordering after room type 12 (skeleton) is the shield room, then the dragon room, then starting over at room type 1 (gold piece). If every room type has appeared at least once, then substitute the next numbered room type that has not yet appeared twice.
Resolving a Room
Indicate that a room has been resolved by marking the small box in the upper-right corner.
Generating a Random Value
Roll a D6.
Acknowledgements
Judgement Quest: Knighthood Adventure (JQ:KA) was inspired by Standard Deck Dungeon (SDD), created by Jesse Ames (http://amesgames.mygamesonline.org/). JQ:KA was created with Jesse's knowledge and blessing. Particular inspirations from SDD include the idea of using a single deck to represent dungeon rooms, inventory items, and random number generation, as well as many ideas for room mechanics and the overall shape of the dungeon.
Special thanks to all the playtesters for sharing feedback, and in particular to Joseph Koehler, for many discussions and suggestions that helped to simplify and streamline the gameplay.
back to main page