Guide to creating a Word Web Site
Quick overview (with very detailed instructions to follow): Create 2 word documents that have hyperlinks to each other. Upload these to panther to create a web site. This is done by the following: Create a word document called index.doc using a table. On the top, have a heading that runs across the page On the left side column, create links for the home and contact pages.. In the main body part, include at least one word art and a downloaded picture and one hyperlink to Adelphi.edu. Save it as index.html with a title and background. Create another word document called contact.doc. It should also have the left side column with links for the home and contact pages. It should also have the heading, a background and a title. Include your contact information in the body. Upload this to the web. You should be able to click on all links. The title should appear in the blue bar.
- Create a new folder named wordweb1 for your web site. (This is important because Word will create many files that will also have to go onto your web site. If you aren’t working in a new, clean directory, you may lose those files.)
- Right click on start.
- Choose explore.
- Arrow down to the Business 115 server and double click it.
- Double click on the folder named for your course.
- Double click on the folder you created with your name.
- Choose file / new / folder and name the folder wordweb1
- Create a new empty document by opening word (start / programs / word) and choosing File / New.
- Save the file as index.doc. (File / save as , and then type index in the filename and leave the type as word document.) Create the web page as a document first, and do all your editing of it as a document. Then, save it as a web site when you want to publish it.
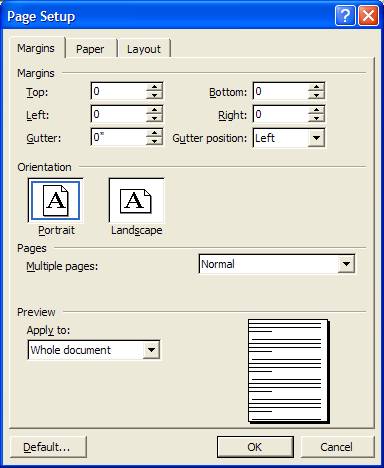
- Setting page margins: Change the page margins to 0” on top and bottom and 0 on the sides. Click on File/Page setup to set these values.
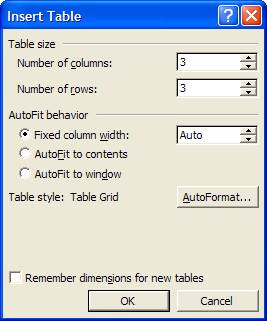
- Inserting a table: Insert a table using Table / Insert Table / rows: 3 and columns: 3
- Highlighting a table: Highlight the whole table. When you hover at the top of the table, the cursor will become a filled down arrow. When you see the down arrow, click your cursor and drag across all the columns.
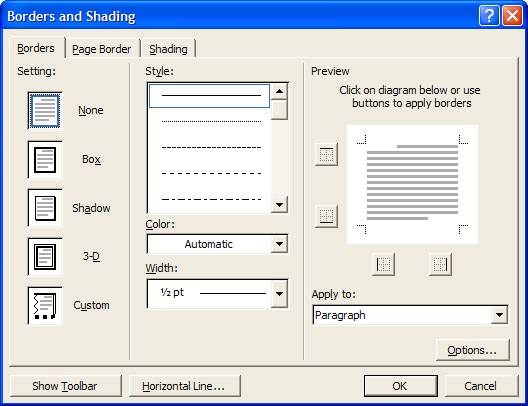
- Setting table borders and selecting all of a document: Erase the table lines by highlighting the entire table (Edit / Select All), and then choosing format / borders and shading and hitting the borders tab, and then pressing the none box.
- Centering text and pictures: Center everything you plan to enter within the table by highlighting the entire table and pressing the center alignment icon.
- Merging the cells: Highlight the top row by hovering to the left of the first row until your cursor becomes an open arrow, and then click to highlight that row. Choose table / merge cells to make the top row all one cell. Repeat this process with the middle and bottom right and the the middle and bottom middle until you have the following grid:

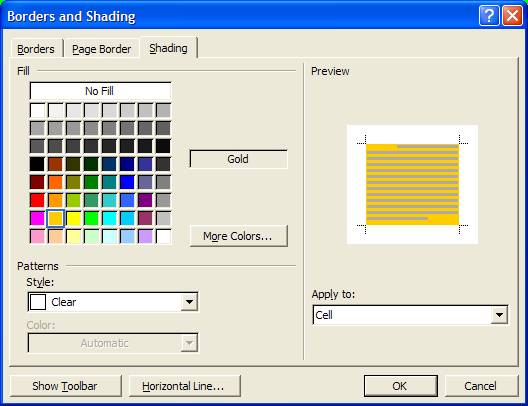
- Setting a background in the any cell: With just the one cell highlighted, choose format / borders and shading, and then click the “shading” tab, and choose your color. (You can choose more than one cell at a time to color.) Repeat to set a background for all cells.
- Insert word art into the middle cell: Show the drawing toolbar by selecting View / Toolbars / and clicking on Drawing if it not already checked. Add word art to express the message on the first line by clicking on the first line of the middle cell. Then, click on the angled “A” on the drawing bar. Select a style enter your message.
![]()
- Insert a picture into the right cell: First, download a picture from the internet into your folder. Insert / picture / from file and navigate to your directory to select the picture. You might need to change files of type to “all” in order to find your picture. (You could also have copied the picture and pasted it in, but I would prefer you use this method as a practice.)
- Resizing pictures: You may need to resize the picture. Click on the picture to see the handles and then squeeze it smaller.
- Resizing table cells: If you had to resize, you will probably have to resize the table. Hover over the center line until it becomes a straight line with two arrows pointing out. Then click and move to the size you want.
- Insert a link to the home page in the middle left cell: Write the word home, highlight it and choose insert / hyperlink. In the address, enter the address index.htm. (This means that the link will take you to index.htm, which is the page it is currently on.)
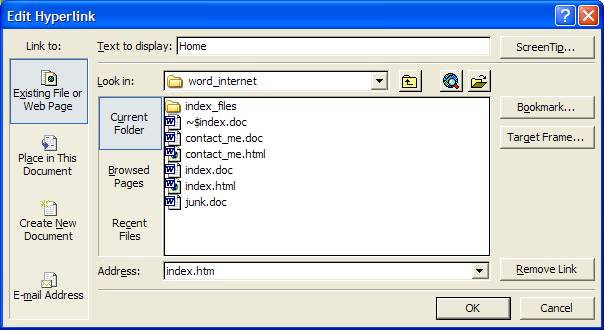
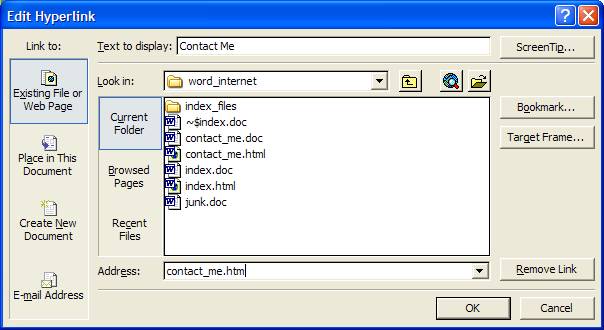
- Insert a link to the contact page in the bottom left cell: Write the words “contact me”, highlight it and choose insert / hyperlink. In the address, enter the address contact_me.htm. (This means that the link will take you to the page contact_me.htm, which is in the same web site.)
- Set the title for the page: Choose file / properties and set the title to “<your name> home page”.
- Save it as a document: Choose file / save.
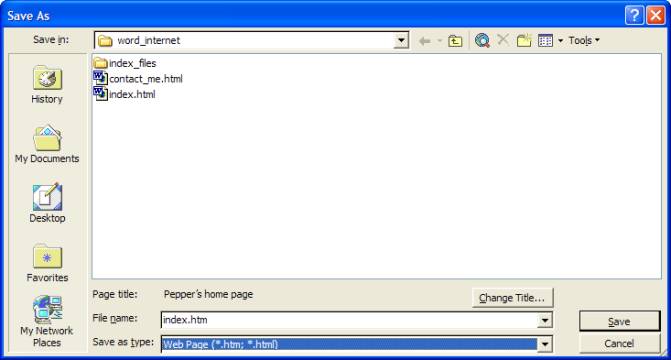
- Save as an html document: Choose file / save as, and then change the “save as type” to “web page” and the filename to index.htm if it is not already set to that.
- Close that document and re-open index.doc.
- Save it as contact_me.doc.
- Change the title by choosing file / properties and change the title to <your name> contact page.
- Clear out the contents of the middle two cells and merge it into one cell.
- Enter your contact information in the new cell.
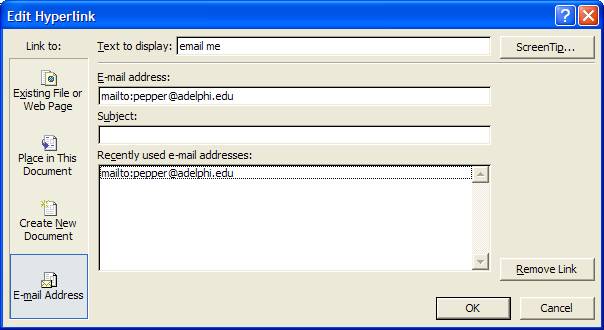
- Create a link to your e-mail: Enter the words “e-mail me” and highlight it. Then choose insert / hyperlink. Click on the “e-mail address” button. Then, enter your e-mail address (after the label mailto:). The label mailto: is a keyword that must appear.
- Save it as a document: Choose file / save.
- Save as an html document: Choose file / save as, and then change the “save as type” to “web page” and the filename to contact_me.htm if it is not already set to that.
- You now have a folder filled with 2 word documents and many documents and folders that need to be copied to your web site. You can test your web site locally by using windows explorer to find the index.htm file and double clicking on it. Check all the links. The e-mail will not be able to complete if there is no e-mail client on the lab computer, but that is okay.
Sample index page:
|
PEPPER’S
HOME PAGE |
||
|
|
|
|


Sample contact page:
|
|
PEPPER’S
CONTACT ME |
|
Adelphi Room 110 516-747-2362 |
|