Step By Step Instructions for creating a Photo Album
As long as you include all the required elements, you can organize this photo album however you like. This tutorial will guide you through specific steps, but you can choose to organize your album differently, as long as it has a cover page, table of contents page, and all the other requirements listed in the main assignment.
1.1.1 Step 1: Open your word processor.
You can start any version of Word or OpenOffice Writer.
This tutorial has notes for many versions of MS Word and OpenOffice Writer.
OpenOffice notes will be preceded with "OO". The tutorial
movies cover each application separately if you are unsure about a certain
step.
For PCs:
* For Windows 7, choose the start circle icon and choose either Open Office or Word or Microsoft Office and then Word.
* For Windows 10, type Word or OpenOffice into the search box.
* Create a new empty document using File / New. (In some versions, you click on the words, "Blank document" or "text document".)
For Macs:
* Click Finder and then applications and then find office word or Open Office and then choose Word document or Text Document.
1.1.2 Step 2: Set up your cover page
Type your cover page information and change font type and size. Center it all.
* Type the title of your document, your name, CSC170 and the date.
* Change the font type of the title
* Word2003 and Mac 2008 and Mac 2011: highlight the title and then choose the format menu, the font option and then choose a different font type.
* Open Office: format / character
* All others: Click the home tab, in the font group see the font types (such as times new roman) and then choose a different font type.
* (If you cannot see the items inside the home ribbon, hit the drop down button the far right, and then click the pin so you can always see the ribbon.)
* Center by highlighting all that you have typed and then:
* Word 2003 and OO: press the center button.
* Mac 2008: click the toolbox and expand the "alignment and spacing" group to find the center button
* All others: click the home tab, and find the center button in the paragraph group
1.1.3 Step 3: Add a page break before Table of Contents
A page break will leave the rest of the page blank and tell the printer to automatically advance to the top of the next page. This saves having to put in enough spaces to get to the next page.
* Insert a page break
* Word 2003 and Mac 2008 and Mac 2011: place your cursor after the date and choose the Insert menu, the break option and then click on "page break".
* Open Office: insert/ manual break
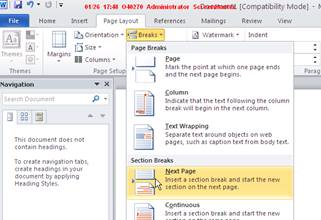
* All Others: Click the Layout Tab (or Page Layout Tab), find the Page Setup Group, click the break command and then click on "page break".
1.1.4 Step 4: Add a section page break after the Table of Contents page
At this point, you are just setting up the place you plan
to ask Word to put the Table of Contents. You will write the label, but wait
until later to generate the table of contents. You are also going to add a hard
section break between the table of contents and the real photo album which
follows. This will separate the two parts so that you can easily start your
page numbering at 1 after the table of contents page.
- Reminder:
You cannot use Online Word 365 as it cannot insert a section break. You will need to download word to your
computer using Download Office free from Adelphi following these
instructions
* Type Table of Contents and then press <ENTER> 4 times to give you some space to work later.
* Insert a section break
* Word 2003 and Mac 2008 and Mac 2011: by choosing the insert menu, the break option and then click on "next page". (Because this is under section break, you will break the document into hard sections in addition to giving it a new page.)
* Open Office: Open Office handles this differently. You must first create a new page style using Format / styles and formatting / click on the page styles button and right click the default style and choose new. Then type "bodytext" as the name; click on the header tab and click "header on" and click on the footer tab and click "footer on". Press OK to accept. Insert / manual page break / click the "page break" button and choose style "bodytext" and click "Change page number" and put 1 in the box below that and click "OK".)
* All Others: Layout Tab (or Page Layout) tab, Page Setup Group, break command)
(Page Layout changed to just Layout in later versions)
1.1.5 Step 5: Fix the headers and footers for the main photo album
Headers and footers are parts of the document that are the same on every page in a section. You don't see them in normal or draft mode at all, but you can see them in print layout and on the printout. You can include page numbers that Word will automatically assign.
* Put your cursor in the section you want to change (after the section break).
* See the footer:
* Word 2003 and Mac 2008 and Mac 2011: choose view / headers and footers. Scroll down to click inside the footer
* OO: Insert / footer
* All others: click the Insert tab; in the header & footer group, click the footer command and then choose "edit footer" at the bottom.
* You will see the words "Same as Previous" or “Link to Previous” above the footer. (If you do not see these words, you either did not create a section break in the prior step OR you did not click inside the second section before viewing the footer.) You want to remove the "Previous" word:
* Word 2003: Click the button that says "Same as Previous" (or “Link to Previous”) when you hover. After you click, it should no longer say "previous" over the footer.
* Open Office: skip this step.
* Mac 2008: Click the toolbox. Expand the "header and footer" group. Unclick the "link to previous" box.
* Mac 2011: Click header and footer ribbon tab and then unclick the link to previous button
*
Word 2016: Click the Design tab (which you can
only see when you are in the footer from the step before); in the navigation
group click the link to previous command. Then, you should no longer see "previous"
over the footer. (This toggles on and off, so clicking it again will connect
the footer back.)
* All Others: In the Header & Footer tab (which you can only see when you are in the footer from the step before); in the navigation group click the link to previous command. Then, you should no longer see "previous" over the footer. (This toggles on and off, so clicking it again will connect the footer back.)
* Repeat the steps above for the header so that the header is also not connected to the first section.
* Add the page number to the footer
* Word 2003 and Mac 2008 and Mac 2011: First seeing your cursor blink inside the footer, and then insert / choose page numbers / hit format button / change the type of number to "1" and change to start at 1.
* OO: inside the footer, insert / field / page number
* All others: click the header and footer tab (or the design tab, and choose the header and footer group), click the page number command, and then choose bottom of page and plain number to add the page number. Then, again in the header and footer group, click the page number command, and this time choose format page number. Change the type of number to "1" and change to start at 1.
* Formatting the page number should look like this for Word :

* Add the filename to the footer
* Word 2003 and Mac 2008 and Mac 2011: first see your cursor blink on the footer, and then insert / field and choose filename. (See all the other fields you could have chosen.)
* OO: You can skip this.
* Word 2016: first see your cursor blink on the footer, and then click the design tab; in the insert group, click the quick parts command and then choose field and filename.
* All others: first see your cursor blink on the footer, and then click the header & footer tab; in the insert group, click the quick parts command and then choose field and filename.
* Add the date to the footer:
* Word 2003 and Mac 2008 and mac 2011: put your cursor where you want the date and click the date button on the header/footer toolbar.
* OO: You can skip this.
* Word 2016: click the design tab; in the insert group, click the date command
* All others: click the design tab; in the insert group, click the date command
* Scroll up and double click in the header for the main album page. Type the Title of your album in the header.
* View the print layout of the document to be sure there is nothing in the header and footer of the cover page and table of contents page, and to be sure the first page that will have a photo shows page number one. View by choosing File and then Print ( and in earlier systems you will need to hit Print Preview also) and then paging down through the pages. (If you cannot get this correct, please still continue with the rest of the assignment.)
1.1.6 Step 6: Prepare your pictures.
* Your goal is to have 3 pictures and changed versions of them. You can use any tool you want to create these pictures. I show you how to use GIMP but feel free to use whatever tool you like. You just need to end up with:
1. 3 original pictures
2. A crop (small portion of a picture)
3. A picture with an effect added, and any effect is fine
4. A picture with text written on it.
* Here are the steps if you want to use GIMP:
· Choose at least 2 or 3 pictures to include in your album. Place them in files on your computer. (If you see a picture on the internet, you can right click it and choose save picture (or image) as, and then download it to your computer either on the desktop in or photos. )
· Open GIMP
· To create the cropped picture:
· Choose File and then Open and then find the pictures you saved. (To find the pictures, you will need to click on desktop or photos on the left first.)
· Choose the crop tool by choosing the tools menu and then transform and then crop.
· Place your cursor on the left top corner of the smaller picture you want to cut out, and then drag to form a box.
1. If you don’t like what you outlined, you can drag the corners of the outline to exactly what you want. You can only drag when the cursor looks like a triangle.
· Double click inside the small box. The rest of the picture should disappear.
· Save this picture as a new name by choosing file then “save as” and then type in the name “cropped”. It will save the file as a xcf extension, which can only be used by GIMP.
·
Save another copy of this cropped picture in a
jpeg format that word can use by exporting it. Choose file / export as / and
then click on “select file type” and choose JPEG image. The filename at the top
should change to cropped.jpg. Click the
Export button and then click the Export button again when presented with
choices for image quality.
· To create the picture with writing:
o Open another picture using File / Open to write on it.
o Pick up a text tool using Tools / Text.
o Click on the picture to create a textbox and then start writing.
o If you want to, you can highlight the words and then change the font to another size. You can also click on the far right grey (or black) box to change the color.
o If you want, you can Use window / dockable dialogs / layers and see that the text created a new layer.
o File / export as a jpg with the name picwithwriting.jpg. (You can also save it in Gimp format as XCF if you think you might want to make changes to it again later.)
· Modify a picture by lightening it:
o Choose a brightness tool by choosing Color / Brightness/Contrast
o Set the Brightness to 90 by dragging the brightness bar or just type in 90. The picture should be much lighter.
o File / export as a jpg with the name lightened.jpg. (You can also save it in Gimp format as XCF if you think you might want to make changes to it again later.)
· Note that you want to export the type as jpg or gif or png because those are small files. If you saved your files as bmp, the files might become too large to upload your document when you are done. Word (and PowerPoint) will incorporate all the bits from the picture when you insert it into the document.
1.1.7 Step 7: Create your first album page:
* Write a title for your first page, and write a title for the first picture.
* Insert the picture using Insert / picture (or photo) / “This device” (or "from file") and choose the file. You may need to click on the picture to get handles in order to drag the corners of the picture to make it smaller.
* Press Enter twice to add some space.
* Insert a table
* Word 2003 & OO & Mac 2008 & Mac 2011: use Table / Insert / table and then choose 1 row and two columns.
* All Others: click the insert tab, then table and choose a table with 1 row and 2 columns
* Inside one cell insert the cropped picture by using insert / picture (or photo) / "from file" and choose the file. (You may need to change file type to "all files" by pressing the down arrow button.)
* Inside the next cell, write something about the picture.
* Remove the borders from this table
* Word 2003 & Mac 2008 and Mac 2011: highlight the entire table and choose format / borders / none.
* OO: highlight the table and then Table / table properties / borders tab / click on a double line border / click on the box with all lines under the word "default"
* All others: highlight the entire table, and then click on the home tab, in the paragraph group, click the border button, and then click no borders.
* Center everything on the page. (Highlight everything on the page and then:
* Word 2003 & OO: click the center button.
* Mac 2008: click the toolbox and then expand the "alignment and spacing" group to find the center button
* All Others: you can find the center button on the home tab
* Note that you can choose to put your album together in a different way if you like. You will still need to include one table with no borders and a cropped picture on the same page as the full picture.
1.1.8 Step 8: Create your second album page:
* Write the title of your second page.
* Write something about the picture.
* Insert another picture.
* Change the picture to have text with the picture on the right.
* Word 2003: right click on the picture and choose format picture / layout and choose the "tight" box and then the "right" button and press "ok". Then, drag the picture next to the text so the text shows next to the picture.
* Mac 2008: control click on the picture and choose format picture / layout and choose the "tight" box and then the "right" button and press "ok". Then, drag the picture next to the text so the text shows next to the picture.
* OO: skip this
* Word 2010: click on picture and the format tab will appear. Click on that format tab and then on "position" and then on "more layout options" and then on text wrapping and then you can choose the "tight" box and then the "right" button and press "ok". Then, drag the picture next to the text so the text shows next to the picture.
* Mac 2011: right click the picture and choose wrap text and then the tight option. You may need to drag the picture into the words after you do this so that the words line up next to the picture.
* All others: right click the picture, choose “wrap text” (or “text wrapping”), and more layout options
* Press Enter twice.
* Insert another table (Table / insert / table and then choose 1 row and 2 columns)
* Change the borders of the table
* Word 2003 and Mac 2008 and Mac 2011: highlight the entire table and choose format / borders / click on a squiggly line border to pick up that border and then click on the All box to use that border on all sides.
* OO: Table / table properties / borders tab / click on the box with no lines under the word "default"
* All Others: highlight the entire table and then click the home tab; in the paragraph group, click the border button's arrow, and then borders and shading. Click on a squiggly line border to pick up that border and then click on the All box to use that border on all sides.
* Insert the same picture with text into one cell. To do this: Insert / picture (or photo) / from file and choose the file. Then click on the picture and drag the corner handles in to make it smaller.
1.1.9 Step 9: Create your third page
* Write a title for the page
* Insert a picture (Insert / picture (or photo) / from file and choose the file. Then click on the picture and drag the corner handles in to make it smaller.)
* Press Enter.
* Insert the version of that same picture that has some changed effect. (Insert / picture (or photo) / from file and choose the file. Then click on the picture and drag the corner handles in to make it smaller.)
* Add some word art on this page or any other
* Word 2003: (Insert / picture (or photo) / Word Art/ choose a type / type in your text and press enter if you want two lines and then choose OK.
* Mac 2008: (Insert / Word Art/ choose a type / type in your text and press enter if you want two lines and then choose OK.
* OO: You would Insert / object / ole object / drawing and then create your own text art, but you can skip this step because it is a bit too difficult in Open Office so you would likely use a different tool and just insert a picture.
* Mac 2011: Insert / word art and then double click inside the word art box to bring up the word art ribbon. Choose shapes and text colors and styles to select your word art style.
* All Others: click on insert tab; in the text group, click on word art command. Choose a type / type in your text and press enter if you want two lines and then choose OK. Use the design toolbar (and shape format bar) to change the art.
1.1.10 Step 10: Create the table of contents
Word creates a table of contents by putting all your document's words that are marked as headings into the table of contents. It is important to first correctly mark the words in your document as headings. Then, you will put your cursor under the table of contents and tell Word you want to insert the table of contents right there. Here are the steps:
* Mark the table of contents entries.
* Highlight the first entry that should be in the table of contents. (If you want "My family" to be in the table of contents, find the words "My Family" in your document, highlight it and then follow the instructions below.)
* Mark that text as a heading style: This style tells word that the text should be included in the table of contents when it is built later. The heading level will determine how indented your table of contents entry will be, so all your major topics should be heading 1 or 2, and the sub-topics should be one less.
* Word 2003 and OO and Mac 2008 and Mac 2011: Choose "format" from the menu, and then choose "styles and formatting" or "style". Double click on "Heading 1" or 2 or 3. You may need to change the value in "list" from "styles in use" to "all styles". This is almost always needed on the Mac.
* All Others: click the home tab, and in the styles group, click on the heading 1 or 2 or 3. (You might need to drop down the arrow to show all styles by clicking the style dialog box (little arrow on bottom of style box) then options and then change "selected styles to show" to "all styles" and then choose a heading on the styles dialog box instead of on the ribbon.
* Repeat this for every entry that needs to be in your table of contents.
* Create the table of contents.
* Put your cursor under the words "TABLE OF CONTENTS" that you typed. (See the cursor blinking on the page.)
* Actually insert the table of contents:
* Word 2003 & OO & Mac 2008 & Mac 2011: Choose "insert" from the menu, and then choose "reference" or "index and tables")
* All others: click on the reference tab; in the table of contents group, click the table of contents command, and then choose “custom table of contents” (or "insert table of contents") towards the bottom or one of the automated table of contents.
* Click on the "table of contents" tab if that is a choice
* Click on OK if that is a choice. The table of contents should now be inserted.
* In some cases, it will create the word "Table of Contents" also, so just delete the words that you had typed.
* To see how to update the table of contents:
§ Right click on the table of contents and choose “update field” and then choose to ‘update entire table’ and then OK. Right now, there will be no changes, but if you do this after making changes to your document, the new headings and page numbers will appear.
1.1.11 Step 11: Upload through Moodle
* Click on the Assignment "Photo Album"
* Click on the Browse button and find your photo album file.
* Choose OK
* Hit the "Upload this file" button.
* See the file uploaded message.