Guide to creating a Word greeting card
Part I - Make a picture a 3-D button or add the fine rotation effect. (Note that you can still receive some credit for the assignment by just doing part II, so if you are confused by Part I, please still attempt Part II.
- Download a picture from google by doing the following:
· Click on www.google.com.
· Click on the images tab.
· Type the name of a type of picture you want to see and press <ENTER>.
· Right click on the picture you want to save and choose save picture as (not save target as).
·
You should then see a screen that asks you to
"Save As" into a specific location.
·
Next to "Save in", click the down
arrow and then you might need to click "my computer" and then
"C" and then "csc170home".
·
When you are done, "Save in" should
have "csc170home".
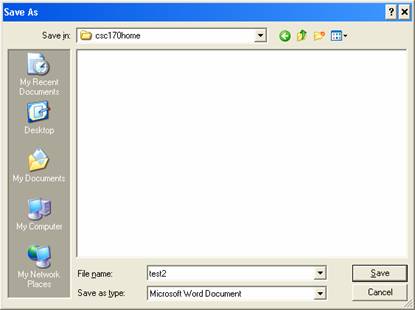
Choose "Save".
- Open Irfanview by double clicking the Irfanview icon on your desktop
- Open the picture by choosing file / open and then pressing the down arrow next to "look in" and double clicking csc170home.
- Double click on the picture you just saved. You should now see your picture in the irfanview window.
- Choose image / effect and then either "fine rotation" or "3D Button".
- Choose file / save
- It may ask you if you want to replace file. You should answer "yes".
Part II: Creating the greeting card
- Create a new empty document by opening word (start / programs / word) and choosing File / New and then choosing “blank document.”
- Setting page margins: Change the page margins to 0” on top and bottom and 0 on the sides. Click on File/Page setup to set these values.

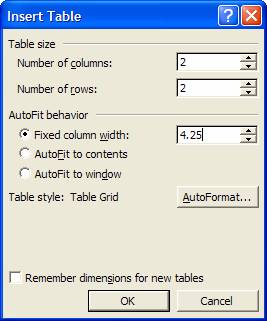
- Inserting a table: Insert a table using Table / Insert Table / rows: 2 and columns 2 and fixed column width of 4.25”
- Highlighting a table: Highlight the whole table. When you hover at the top of the table, the cursor will become a filled down arrow. When you see the down arrow, click your cursor and drag across all the columns.
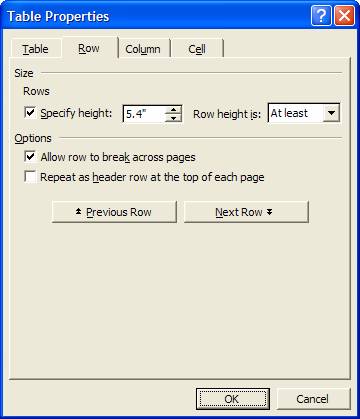
- Using Table Properties: Edit table properties using Table / Table Properties. Set the row height to be 5.4” by clicking on the row tab.
- Create the front picture in the bottom right corner. Position your cursor in the bottom right cell and then press <ENTER> a few times to give yourself room.
- Highlighting a cell: Highlight just that bottom right cell. When you hover on the left side of the cell, the cursor will become an filled arrow pointing at an angle. Click then to highlight the whole cell.
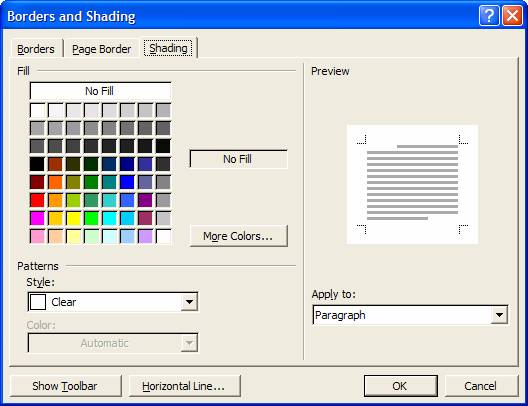
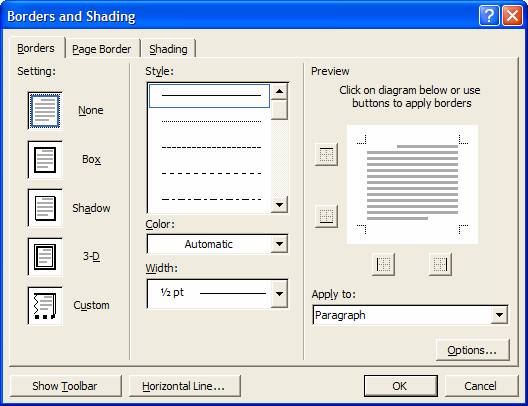
- Setting background colors: Set a background color for the first page by choosing Format / Borders and Shading and select the shading tab. Then, choose either a color or pattern.
- Using Word Art: Show the drawing toolbar by selecting View / Toolbars / and clicking on Drawing if it not already checked. Add word art to express the message on the first line by clicking on the first line of that bottom right cell. Then, click on the angled “A” on the drawing bar. Select a style enter the message for the front.
![]()
9a. Using pictures: Hit enter to put your cursor underneath the word art. Then insert / picture / from file or from clip art to illustrate the card. If you prefer, you can just copy a picture from google and paste it in.
- Resizing pictures: You may need to resize the picture. Click on the picture to see the handles and then squeeze it smaller.
- Resizing table cells: If you had to resize, you will probably have to resize the table. Hover over the center line until it becomes a straight line with two arrows pointing out. Then click and move to 4.25” columns. Do the same for the rows, setting them at 5.4” each.
- Setting text color and font types: Set the logo on the back of the card by editing the bottom left cell. Press enter until you are at least half way down the cell. Insert picture / from file, and then choose the file you changed in irfanview in csc170home, and then resize it to be very small. Then press enter and give yourself credits by “Notes by <your name>”. Set this to a nice font and color with Format / Font.
- Rotating word art: Set the message on the inside of the card. This has to be upside down, so it needs to be created in word art and rotated. Click into the top left corner. Click on the angled “A” on the drawing bar. Choose an easy to read format such as the first one, and enter the full inside message, choosing size 16. Press <Enter>. Click once on the word art, and then get the format display by choosing Format / Word Art and choosing rotation of 180.

- Setting table borders and selecting all of a document: Erase the table lines by highlighting the entire table (Edit / Select All), and then choosing format / borders and shading and hitting the borders tab, and then pressing the none box.
- Centering text and pictures: Center everything you entered within the table by highlighting the entire table and pressing the center alignment icon.
|
|
|
|
Notes By: Pepper |
|